The Bite Block Blog
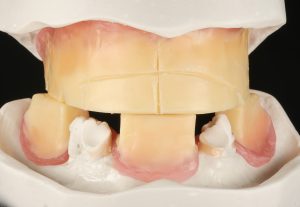
In removable dentistry, we are facing multiple challenges. One of the biggest challenges is that we are supposed to set teeth in a “big black hole”, like a blank canvas. While this sounds like an impossible feat, we know that we can utilize tools to help us to establish a starting point. When we look at an edentulous patient, in many cases, the vertical dimension of occlusion (VDO) and aesthetics are lost or a focus for improvement. So, we must start by putting landmarks in place. What is the solution for establishing a correct VDO or to set up the correct anterior tooth position and ideal buccal corridor? The ideal tool is the bite registration or what we call it in dental slang, the “bite block.”
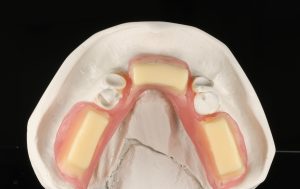
The concept of the bite block, which is a fundamental component in dentistry, helps us to establish the patient’s VDO. It identifies incisal edge, midline position, smile line, and plane of occlusion. The bite block consists of a base plate and a wax rim. The base plate is usually made of acrylic or a light cure resin-based material and the wax rim is soft so there can be markings made directly to it. The wax rim gives you tooth position, not only from the vertical standpoint but also from the buccal corridor and facial extension. To achieve this information, the clinician can cut, add, and/or carve the wax to its final size and shape. The bite block is used in edentulous treatment workflows and has to be properly retentive and fitting. For implant retained restoration, we can utilize retentive attachments like locator like clips or we can screw retain the bite block to make sure it has a stable fit which can be re produced on the master cast in the laboratory, so we can articulate the master cast with the opposing model. For non-implant cases, we must make sure to utilize certain undercuts at the ridges and/or extend the bite block similar like a denture, so it has the “suction” effect, therefore incorporating a post damn is a good feature. With these added features the bite block should be stable enough to take the occlusal record. In some cases, we have to utilize denture adhesive to be able to achieve a stable fit and hold of the bite block in the mouth. That is why the bite block the gold-standard. The bite block average measurement are 22 mm for the maxillary arch and 18 mm for the mandibular arch
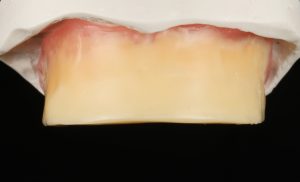
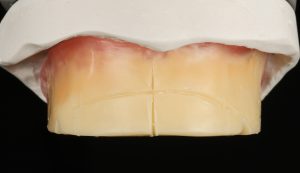

When the bite block fits perfectly and all adjustments are made, the clinician needs to take photos so we can see what the patient looks like. Important photos are: Full face retracted, full face smile, profile in rest and profile in smile. These photos are a huge help and are fundamental for the technician to understand the case, since we are usually not in the same room as the clinician with the patient. The wax rim that we utilize elevates the patient experience because it is vanilla-scented and beige-colored so it smells great and resembles teeth. This allows patients to already imagine where the teeth are going to be.
In August, Zahntechnique is releasing our Removable Webinar Series of six modules and we are opening up our series with the fundamentals and basics of removable dentistry, which will include the bite block and its use. Don’t forget to register by clicking here.
Zahntechnique Removable Webinar Series
At Zahntechnique, we’re always focused on educating and consulting with our clients about the latest and most important topics in dentistry. This summer, we have something special prepared to help you enhance your skills in removable dentistry, so you’re equipped to assist your patients, even with the less favored treatment approaches – removable.
Together, let’s turn these into our favorites. In reality, removable dentistry is the foundation of almost every complex treatment, whether it’s a flipper for a single-tooth implant, a full denture, or an implant-retained overdenture. We’re here to support you and meet both your needs and those of your patients.
Below are the topics for our upcoming webinars, which are divided into six easy-to-watch modules.
Module 1. Basic Foundation to Removable Dentures and Partial Dentures
Wednesday, August 14, 2024
Removable dentistry may not be a favorite among many dentists and their patients, but it is crucial for providing comprehensive care, especially for those with complex restorative needs. Not everyone can afford fixed implant restorations, so we need modern approaches to offer viable solutions for edentulous patients. I am confident we can continue to innovate and elevate the standards in removable dentistry.
Learning Objectives:
• Understand the fundamental components of removable dentistry
• Clearly describe the necessary steps to achieve successful results
• Utilize models, custom trays, and bite blocks to establish a VDO, ensuring clear communication between the dental office and laboratory
• Save chair time and appointments
Module 2. Analog Removable Full Dentures and Partial Dentures
Wednesday, August 21, 2024
Smiling from ear to ear? There are many advantages to complete and partial dentures. They are designed to closely resemble natural teeth, so there should be no noticeable change in appearance. New advancements help dentures appear more natural. Dentures are cost-effective and durable with proper maintenance, improving chewing functions, enhancing appearance, improving speech, and benefiting patients’ nutrition.
Learning Objectives:
• Learn the steps to confidently approach removable dentistry
• Discover the best methods to achieve amazing results for patients
• Follow a step-by-step guide from start to finish
3. Digital Removable Full Dentures and Partials
Wednesday, August 28, 2024
The world is going digital, and dentures are no exception. Full dentures are one of the last frontiers where we still hesitate to go fully digital, but there’s no reason to wait. Workflows and materials are available to plan, design, and fabricate dentures and partials digitally. This module will guide you through digital record-taking and the steps needed to plan and execute digital dentures and partials with your laboratory.
Learning Objectives:
• Identify the necessary records for digital dentures
• Follow a step-by-step process from start to finish of digital dentures
• Explore available materials
Module 4. Implant Over Dentures – Analog/Digital
Wednesday, September 4, 2024
Fixed implant hybrid dentures are a common restorative solution in today’s dental practices, but there’s more than just screw-retained hybrids. What if the clinical or technical situation doesn’t allow for a fixed solution? Aesthetically or economically, we may need alternatives. The Over Denture module will show and explain viable options beyond fixed hybrids, whether analog, digital, or a combination. We can plan, design, and execute great overdenture solutions.
Learning Objectives:
• Identify necessary records, both analog and digital
• Follow a step-by-step process from start to finish
• Explore available material options
Module 5. Telescopes
Wednesday, September 11, 2024
The German Crown offers no moving attachments, is extremely stable in fit, and hygienic. Whether supported by implants, teeth, or a combination of both, telescopes are an excellent solution for many dental situations across different ages. This module will introduce you to the so-called German Crown and the possibilities of this restorative solution, whether for full arches or partials.
Learning Objectives:
• Identify necessary records, both analog and digital
• Follow a step-by-step process from start to finish
• Explore available material options
• Understand indications
Module 6. Attachment Bar Solutions
Wednesday, September 18, 2024
Fixed or not fixed, no questions asked. This overdenture type is ideal for patients seeking something very hygienic, super aesthetic, and easy to maintain. In this module, we will explain the advantages and workflows necessary to achieve what is likely one of the best solutions for full arch restorations. Whether digital, analog, or a combination, we can employ multiple ways to reach the final destination for this kind of solution.
Learning Objectives:
• Identify necessary records, both analog and digital
• Follow a step-by-step process from start to finish
• Explore available material options
• Understand indications
Please join us as we delve into these exciting topics and elevate your practice in removable dentistry! Click here to register for the Zahntechnique Removable Webinar Series.

This continuing education activity has been planned and implemented in accordance with the standards of the ADA Continuing Education Recognition Program (ADA CERP) through joint efforts between Dental CE and Zahntechnique. If tuition was collected, Dental CE Solutions is not responsible for any reimbursement due to cancellation of an event. Reimbursement is the sole responsibility of Zahntechnique. Zahntechnique reserves the right to cancel a course no later than 14 days prior to the course date. Dental CE Solutions is an ADA CERP recognized provider. ADA CERP is a service of the American Dental Association to assist dental professionals in identifying quality providers of continuing dental education. ADA CERP does not approve or endorse individual courses or instructors, nor does it imply acceptance of credit hours by boards of dentistry. Dental CE Solutions designates each activity for 1 continuing education credit. Concerns or complaints about a CE provider may be directed to the provider or to the Commission for continuing Education Provider Recognition at CCEPR.ADA.org
A Simple Shade Taking Protocol
Overview
Shade matching in aesthetic dentistry can present challenges, but with careful consideration and proper protocols, it can be successfully achieved.
Material Selection
Material selection plays a crucial role in achieving an optimal match for the final restoration. Whether it’s zirconia, Lithium Di-Silicate, PFM, layered, or monolithic, the choice depends on factors such as the patient’s tooth shade, characterization, and translucency. It is advisable to entrust the decision to the dental technician, who possesses extensive experience with various materials.
Communication
Effective communication is paramount throughout the shade matching process. When the laboratory is local, arranging for the patient to visit and undergo shade matching directly with the technician is ideal. However, if the laboratory is located elsewhere, a specific protocol should be followed.
Protocol
The protocol involves capturing various photographs:
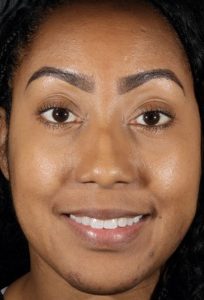
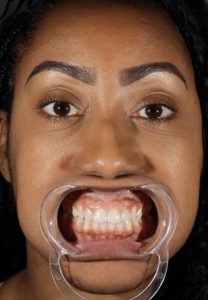
1. Full Face
Full face photo, including a smile, and a retracted full-face photo.
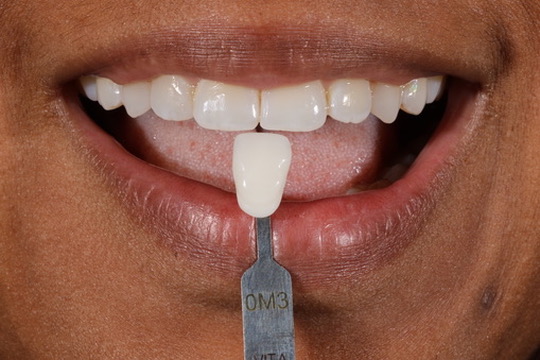
2. Shade Tabs
Close-up photo of the aesthetic area to be treated, using the closest matching shade tab, positioned with the incisal edge facing adjacent to the tooth being matched.
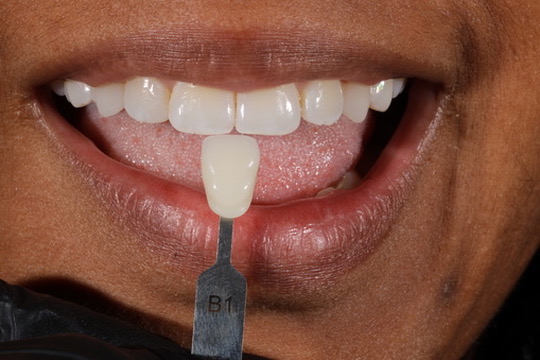
3. Darker Shade Tab
Repeat the close-up photo as in Step 2, but with a shade one step darker
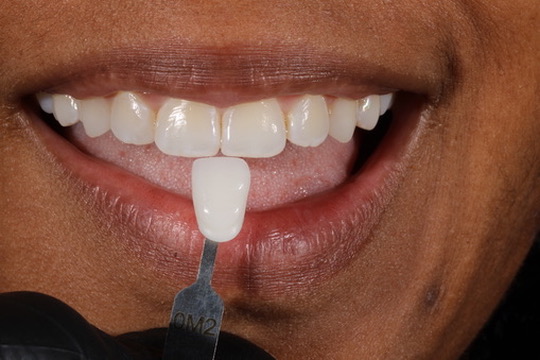
4. Lighter Shade Tab
Repeat the close-up photo as in Step 2, but with a shade one step lighter.
5. Stump Shade Tab
When applicable, take a stump shade photo with the closest matching shade tab.
Tips
- Ensure that the shade tabs are clearly visible and readable in all photographs.
- Maintain a consistent camera angle to avoid distortions caused by light reflections.
- Target the camera to the facial aspect of the tooth with a slight downward angle; angling from the incisal edge upwards should be avoided.
- Photography equipment, such as ring flashes or twin flashes, should be carefully calibrated to prevent overexposure, which can hinder accurate shade matching.
- Avoid using softboxes or filters for shade photography, as they can introduce errors.
This protocol provides a fundamental workflow for shade matching. However, personalized guidance and assistance can be provided to ensure confidence in treatment planning for aesthetic cases.
I am available to personally review this protocol with you, ensuring readiness for your next patient’s aesthetic treatment plan.

